🖍️ Handwriting Worksheet Generator
Type any words or sentences and print them as traceable practice text on proper three-line guides. Works for single letters, sight words, or the sentence your class is copying this week.
🖨️ Prints on one page ⚡ Instant preview 🆓 Free, no sign-up
Classic setup: trace one row, then write it from memory on the blank row below.
What it prints
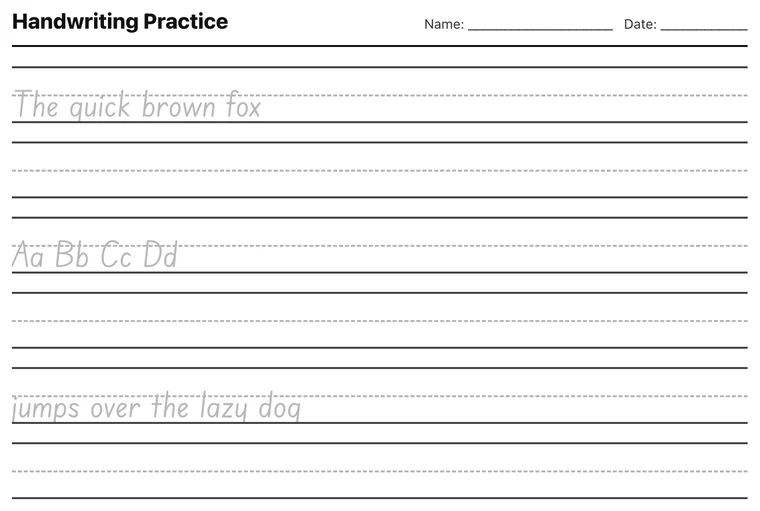
How to make a handwriting worksheet in 4 steps
- 1 Type the lines to practice One row per line of text. Leave a line empty to get a blank row, which is how you build trace-then-write on the same sheet.
- 2 Add a blank row after every line The checkbox that turns a tracing sheet into a practice sheet. Trace the model, write it again underneath without help.
- 3 Title the worksheet The heading prints with a name and date field, so the sheet works as something you can hand in and mark.
- 4 Check the preview and print What you see is what prints. Nothing from the website comes with it.
Line height is the setting that matters most
Almost every complaint about handwriting worksheets comes down to the wrong line height. Too narrow and a five year old physically cannot land the letters, so the page looks like failure. Too wide and a nine year old writes enormous letters and learns nothing.
Match the line to the hand, not to the grade on the label.
| Level | Line height | Guide lines |
|---|---|---|
| Pre-K and K | About 20mm | Solid top, dotted middle, solid base |
| 1st grade | About 15mm | Same three lines, closer together |
| 2nd grade | About 11mm | Dotted middle still useful |
| 3rd and up | 8mm or standard ruled | Base line only |
Which handwriting style to put on the page
Schools do not agree on this, and a child taught one style at school and another at home ends up with neither. Before printing anything, check which one the classroom uses. If nobody can tell you, ask to see a worksheet the child brought home and copy whatever the letter a looks like.
The differences are small on paper and large for a six year old. A ball-and-stick a is a circle with a line; a D'Nealian a already carries the exit tail that later becomes a cursive join. Switching styles mid-year is the single fastest way to make legible handwriting fall apart.
| Style | Where it is used | What it looks like | Worth it if |
|---|---|---|---|
| Zaner-Bloser | Most common in US schools | Upright ball-and-stick, no tails | You want the simplest shapes for a beginner |
| D'Nealian | Widely used in K to 2 | Slanted, letters end in a small tail | Cursive is coming in 2nd or 3rd grade |
| Continuous cursive | UK and Australia | Every letter starts on the base line | The school teaches joined writing from the start |
Trace, then copy, then write from memory
A worksheet that only traces produces a student who can only trace. The sequence that transfers is three steps, and the generator supports all three on one page if you add a blank row after every line.
Trace the model
Builds the motor path. One or two rows is enough. More than that and attention drops off, which is when sloppy tracing starts teaching sloppy letters.
Copy underneath
The model is still visible but the hand is unsupported. This is where most of the learning happens and it is the step people skip.
Write it covered
Fold the sheet or cover the model. If it falls apart here, the letter is not learned yet, and that is useful information rather than a failure.
Teach letters in stroke groups, not alphabetical order
A to Z is the worst possible teaching order. It puts a, b and c together, which share nothing, and separates letters built from the same movement.
Group by how the hand moves and letters start reinforcing each other instead of competing:
| Group | Letters | Shared movement |
|---|---|---|
| Down strokes | l, i, t, u, y, j | Straight down, the easiest starting point |
| Curves back | c, a, d, g, o, q, e, s | Anticlockwise circle starting at 2 o'clock |
| Down and over | r, n, m, h, b, p, k | Down, retrace up, arch over |
| Diagonals | v, w, x, z | Hardest, leave for last |
How much practice, and when to stop
Ten minutes a day beats forty minutes on Friday. Handwriting is motor learning and motor learning consolidates through frequency, not duration. A daily half page is the right dose for most ages.
Stop the session the moment the letters get worse. Practicing past fatigue rehearses the bad version, which is worse than stopping early. For a five year old that point often arrives after four or five lines.
Take a position on pencil grip: correct it before age six, and after that leave it alone unless the child is in pain or cannot keep up. A functional unusual grip in a nine year old is not worth the fight, and the research on retraining older children is not encouraging.
Left-handed writers need three changes, not sympathy
Roughly one child in ten writes with their left hand and most handwriting advice is written for the other nine. The problems are mechanical and three adjustments fix most of them.
Tilt the paper the other way. A right-hander tilts the top of the page to the left; a left-hander needs it tilted to the right, often quite steeply. Getting this wrong is the main cause of the hooked wrist, where the hand curls over the top of the line so the writer can see what they are doing.
Move the grip further up the pencil. Holding close to the tip is fine for a right-hander and blocks a left-hander's view of the letter they are forming. About three centimetres from the point is usually enough.
Seat them on the left of a pair. Two children sharing a desk with the left-hander on the right will knock elbows all year, and the left-hander is the one who adapts by contorting.
One thing not to worry about: smudging. It comes with the territory when the hand follows the writing, and a pencil or a quick-drying pen solves it better than any change to technique.
Frequently asked questions
What's the difference between this and the name tracing tool?
Same engine, different job. Name tracing repeats one name down the whole page automatically. This one gives you full control: each line you type becomes one row on the sheet, so you can mix a letter row, a word row, and a sentence row on the same page.
Can I print blank handwriting lines without any text?
Yes. Leave a line empty (or type only spaces) and it prints as a blank guide row for freehand practice. A common setup is: one traceable row, then one blank row to write it from memory.
What font style does it use?
A simple, unlooped print style close to what US schools call manuscript (Zaner-Bloser/D'Nealian territory). The letterforms are deliberately plain: no decorative fonts, because kids copy exactly what they see.
Is tracing actually good practice, or should kids write freehand?
Both, in that order. Tracing builds the motor pattern; freehand consolidates it. That's why the blank-row trick matters: trace one line, write one line. If a child only ever traces, they get good at tracing, not writing.
What is the difference between D'Nealian and Zaner-Bloser?
Zaner-Bloser is the upright ball-and-stick print most American schools teach. D'Nealian slants slightly and adds exit tails to most lowercase letters so the transition to cursive is smaller. Neither is better; what matters is matching whichever one the school uses, because mixing them is what confuses children.
Can I make a handwriting worksheet for an adult?
Yes, and the settings are different from a child's. Use a normal line height rather than a tall one, turn tracing off, and paste a paragraph to copy rather than isolated letters. Adult handwriting improves through copying real text at normal size, not through letter drills.